8 min to read
Databricks Step by Step: Serve a Model as an API
The app team doesn't want a notebook. They want a URL that answers in 100 milliseconds.
Picture the handoff meeting.
The data science team shows off a fare prediction model. It’s accurate, it’s tracked, it’s registered. The app team nods politely and asks one question: “So what’s the URL?”
A model in a registry can’t answer a ride-booking app that needs a fare estimate before the customer taps “confirm.” Something has to load the model, keep it warm, accept HTTP requests, scale up during rush hour, and scale down at 3 AM. That something used to be a Flask app, a Docker image, a load balancer, and a week of an engineer’s time.
On Databricks it’s a Model Serving endpoint, and it takes a few minutes.
This is part 3 of Databricks Step by Step. Part 2 trained a taxi fare model and registered it in Unity Catalog as main.ml.taxi_fare with a champion alias. Now we put it behind an API.
What We’re Building
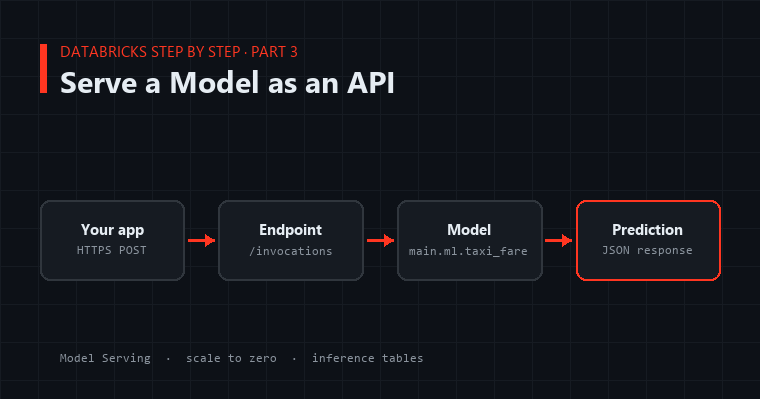
  Ride app ──HTTPS──► /serving-endpoints/taxi-fare/invocations
                                   │
                                   ▼
                     Model Serving endpoint "taxi-fare"
                     ├─ serves main.ml.taxi_fare (version N)
                     ├─ scales with traffic
                     └─ logs requests for monitoring
                                   │
                                   ▼
                        {"predictions": [14.82]}
Model Serving is serverless. You don’t pick machines or patch operating systems. You say which model, which version, and roughly how much traffic, and Databricks runs it.
Step 1: Find the Version to Serve
Endpoints serve a specific version number, so look up which version the champion alias points to:
from mlflow import MlflowClient

MODEL_NAME = "main.ml.taxi_fare"
client = MlflowClient(registry_uri="databricks-uc")

champion = client.get_model_version_by_alias(MODEL_NAME, "champion")
print(f"champion is version {champion.version}")
Resolving the alias in code, rather than typing a version number, means this same script deploys whatever the current champion is. Run it after every promotion and the endpoint follows the alias.
Step 2: Create the Endpoint
You can click through Serving → Create serving endpoint in the UI, and it’s worth doing once to see the options. For anything you’ll repeat, use the Databricks SDK:
from databricks.sdk import WorkspaceClient
from databricks.sdk.service.serving import EndpointCoreConfigInput, ServedEntityInput

w = WorkspaceClient()

w.serving_endpoints.create_and_wait(
    name="taxi-fare",
    config=EndpointCoreConfigInput(
        served_entities=[
            ServedEntityInput(
                name="taxi-fare-champion",
                entity_name=MODEL_NAME,
                entity_version=champion.version,
                workload_size="Small",
                scale_to_zero_enabled=True,
            )
        ]
    ),
)
What the settings mean:
entity_nameis the full three-part Unity Catalog name.workload_sizesets how much concurrent traffic the endpoint handles.Smallis plenty for testing and modest production use.scale_to_zero_enabled=Trueshuts the endpoint down when nobody is calling it, so a dev endpoint costs nothing overnight. The trade-off is a slow first request after it’s been idle (a “cold start”). For a customer-facing app, set this toFalse.
create_and_wait blocks until the endpoint is ready, which usually takes several minutes the first time while Databricks builds the model’s environment. Endpoint names can’t start with databricks-; that prefix is reserved for the endpoints Databricks provides.
Step 3: Call It
Every endpoint gets a REST URL in the same shape:
https://<your-workspace>/serving-endpoints/taxi-fare/invocations
The request body uses the dataframe_split format: column names once, then rows of values. Here’s a call from any Python app, inside Databricks or out:
import os
import requests

host = os.environ["DATABRICKS_HOST"]      # e.g. https://your-workspace.cloud.databricks.com
token = os.environ["DATABRICKS_TOKEN"]    # never hard-code this

payload = {
    "dataframe_split": {
        "columns": ["trip_distance", "pickup_hour", "pickup_dow", "pickup_zip", "dropoff_zip"],
        "data": [
            [2.4, 8, 2, 10001, 10016],
            [11.0, 23, 6, 11430, 10019],
        ],
    }
}

resp = requests.post(
    f"{host}/serving-endpoints/taxi-fare/invocations",
    headers={"Authorization": f"Bearer {token}"},
    json=payload,
    timeout=10,
)
resp.raise_for_status()
print(resp.json())   # {"predictions": [12.73, 41.08]}
The columns match the model’s signature from part 2. That’s the payoff of logging a signature: the endpoint validates every request against it and rejects malformed ones with a clear error, instead of guessing.
From inside a Databricks notebook there’s a shorter path, the MLflow deployments client:
from mlflow.deployments import get_deploy_client

deploy = get_deploy_client("databricks")
deploy.predict(endpoint="taxi-fare", inputs=payload)
About that token. For testing, a personal access token works. For a production app, use a service principal with OAuth machine-to-machine credentials, and grant it only permission to query this endpoint. Store the secret in your app’s secret manager, never in code.
Step 4: Ship a New Version Without Downtime
When part 2’s retraining loop promotes a new champion, update the endpoint to serve it:
champion = client.get_model_version_by_alias(MODEL_NAME, "champion")

w.serving_endpoints.update_config_and_wait(
    name="taxi-fare",
    served_entities=[
        ServedEntityInput(
            name="taxi-fare-champion",
            entity_name=MODEL_NAME,
            entity_version=champion.version,
            workload_size="Small",
            scale_to_zero_enabled=True,
        )
    ],
)
Databricks starts the new version, waits until it’s healthy, and only then shifts traffic to it. If the new version fails to start, the old one keeps serving. Callers never see a gap.
For a cautious rollout, serve both versions and split the traffic, say 90% to the current champion and 10% to the challenger. Watch the challenger’s behavior on real requests, then shift the rest. Traffic splitting is a setting on the endpoint configuration, in the UI or the SDK.
Step 5: Watch It
An endpoint you can’t see into is an endpoint you can’t trust. Three things to set up:
- The endpoint’s metrics page. Request rate, latency, and error rate are built in. Look at it after every deploy.
- Inference tables. Turn these on in the endpoint’s settings, and every request and response is logged to a Delta table in Unity Catalog. Now you can query exactly what the model was asked and what it answered, which is invaluable when someone says “the fare estimate was wrong yesterday.”
- Drift checks. Taxi fares change when fuel prices or city rules change. Compare the inputs and predictions in the inference table against the training data on a schedule. When they drift apart, it’s time to retrain. Part 2’s challenger loop is ready for exactly that moment.
What Can Go Wrong
The endpoint fails to build. Usually a dependency problem. Open the endpoint’s build logs. Models logged with mlflow.sklearn.log_model capture their package requirements automatically, but a custom model that imports something unusual needs pip_requirements= at logging time.
400 errors from the app. The request doesn’t match the signature: a missing column, a misspelled name, or a string where a number belongs. The error message names the problem.
The first request is very slow. That’s scale-to-zero waking up. Either accept it for dev endpoints, or turn scale-to-zero off where latency matters.
Permission denied when creating the endpoint. The creator needs USE CATALOG, USE SCHEMA, and EXECUTE on the model in Unity Catalog.
Where This Goes Next
You now have the full classic ML lifecycle on Databricks: a pipeline makes clean data, a training job produces versioned models, and an endpoint serves the champion to any app that can make an HTTP call.
Next in the series we switch from predicting numbers to answering questions: building a RAG chatbot over your own documents, using AI Search and a hosted LLM.